
Getting a tattoo feels exciting until the itching starts.
I still remember my first tattoo: a small black ink design on my forearm. The first couple of days were fine, just a bit sore. Then day three hit, and suddenly it felt like ants were crawling under my skin. That’s when I realized nobody really prepares you for the itching phase.
If you’re dealing with an itchy tattoo right now or planning to get one this guide will walk you through exactly what’s happening, stage by stage. Not textbook theory, but real, practical insight from experience (including a few mistakes you should avoid).
Contents
- 1 Why Tattoos Itch in the First Place
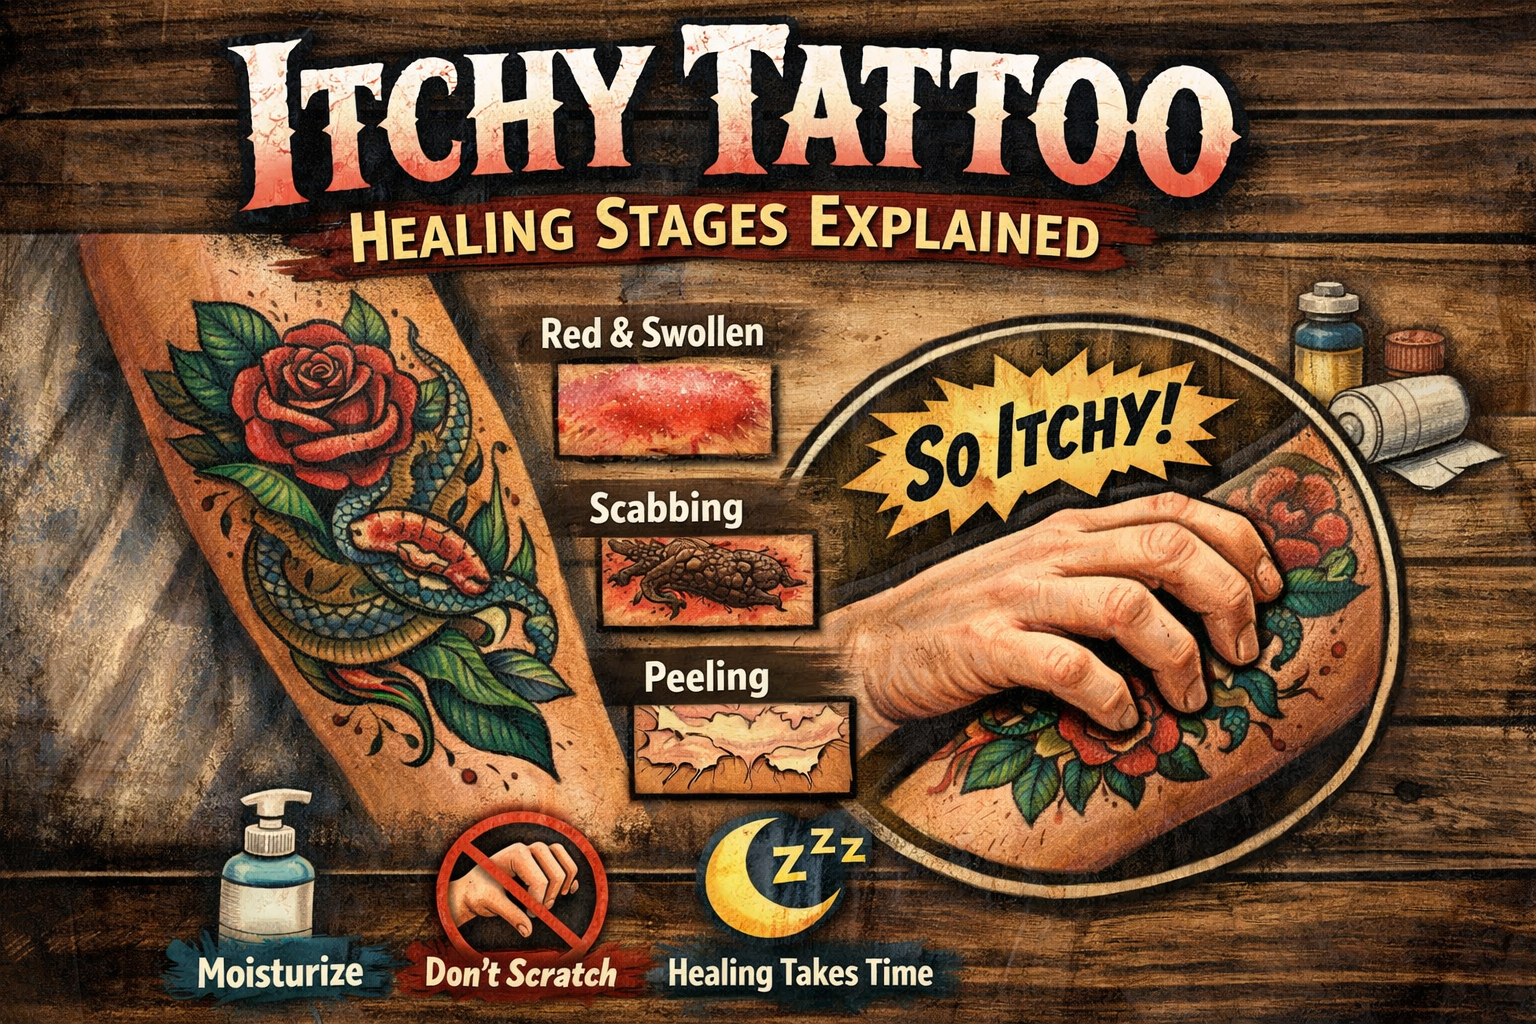
- 2 Stage 1: Fresh Tattoo (Days 1–3) “It Hurts More Than It Itches”
- 3 Stage 2: Early Healing (Days 3–7) “The Itch Begins”
- 4 How to Handle It (Without Ruining Your Tattoo)
- 5 Stage 3: Peeling & Flaking (Days 7–14) “The Ugly Phase”
- 6 Stage 4: Deep Healing (Weeks 2–4) “It Looks Healed… But It’s Not”
- 7 Stage 5: Fully Healed (After 4–6 Weeks)
- 8 Lessons I Learned the Hard Way
Why Tattoos Itch in the First Place
Before diving into the stages, it helps to understand why the itching happens.
A tattoo is basically a controlled injury. The needle repeatedly punctures your skin and deposits ink into the dermis layer. Your body responds by:
- Triggering inflammation
- Sending white blood cells to repair damage
- Regenerating skin cells
That healing process is what causes the itching not the ink itself.
Think of it like a healing cut, but stretched over a larger area.
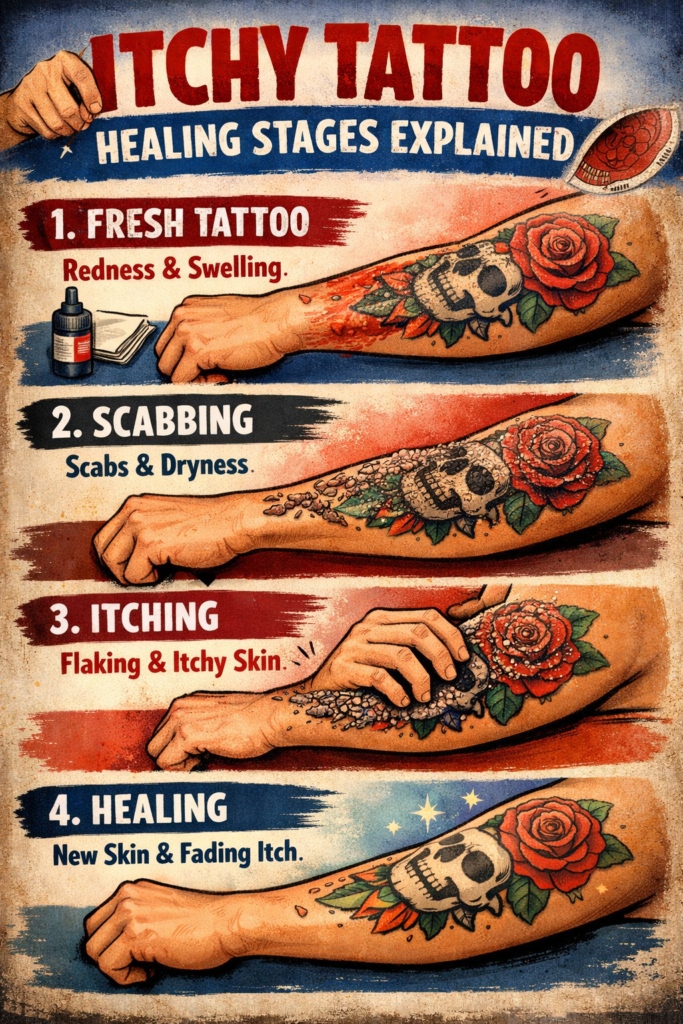
Stage 1: Fresh Tattoo (Days 1–3) “It Hurts More Than It Itches”
What it feels like:
- Tender, sore, slightly swollen
- Warm to the touch
- Minimal itching (if any)
Right after getting tattooed, itching usually isn’t the main issue. It’s more like a sunburn mixed with bruising.
My experience:
I kept checking my tattoo every hour because I was paranoid something would go wrong. But honestly, the first stage is mostly about managing soreness, not itchiness.
What’s happening under the skin:
- Your body is sealing the wound
- Plasma and a bit of ink may leak (totally normal)
- A protective layer begins forming
What to do:
- Keep the tattoo clean (gentle wash with fragrance-free soap)
- Pat dry don’t rub
- Apply a thin layer of recommended ointment (don’t overdo it)
Common mistake I made:
I used too much ointment. It made the skin overly moist, which delayed healing and actually made itching worse later.
Stage 2: Early Healing (Days 3–7) “The Itch Begins”
This is where things get real.
What it feels like:
- Mild to intense itching
- Tight, dry skin
- Beginning of scabbing or flaking
For me, day 4 was the turning point. I woke up in the middle of the night wanting to scratch my arm like crazy.
What’s happening:
- Skin is starting to dry out
- Scabs are forming
- Nerve endings become more sensitive during repair
Why it itches more now:
As new skin forms, it pulls on surrounding tissue. Combine that with dryness, and you get that irritating itch.
How to Handle It (Without Ruining Your Tattoo)
Here’s what actually worked for me:
Step 1: Moisturize (But Lightly)
Use a fragrance-free lotion.
- Apply a thin layer 2–3 times a day
- If it looks shiny or greasy, you used too much
Step 2: Tap, Don’t Scratch
Instead of scratching:
- Gently tap the area
- Or lightly slap it (sounds weird, but it works)
Step 3: Keep It Cool
- Avoid hot showers directly on the tattoo
- Use cool air or a fan to reduce itchiness
Step 4: Wear Loose Clothing
Tight sleeves made my tattoo itch 10x worse due to friction.
Big mistake to avoid: scratching
I gave in once. Just once.
It pulled off a tiny scab and that spot healed slightly lighter than the rest.
That’s how tattoos get patchy.
Stage 3: Peeling & Flaking (Days 7–14) “The Ugly Phase”
This stage is both satisfying and uncomfortable.
What it looks like:
- Peeling skin (like after a sunburn)
- Flakes coming off
- Tattoo may look dull or cloudy
What it feels like:
- Peak itchiness
- Dryness
- Slight tightness
My experience:
I thought my tattoo was fading because it looked dull and flaky. Turns out, that’s completely normal. The fresh skin underneath just hasn’t fully settled yet.
What’s Actually Happening
- Dead skin is shedding
- New skin is forming underneath
- Ink is stabilizing in the dermis
What to Do During This Stage
Keep Moisturizing
This is when lotion matters most.
- Apply after washing
- Don’t let it dry out completely
Let the Skin Peel Naturally
Do NOT:
- Pick flakes
- Peel skin manually
Even if it’s tempting (and it will be), resist it.
Stay Hydrated
This might sound unrelated, but drinking enough water helps your skin heal better.
Real-world example:
A friend of mine peeled his tattoo early because he thought it would “speed things up.” The result? Uneven color that needed a touch-up later.
Stage 4: Deep Healing (Weeks 2–4) “It Looks Healed… But It’s Not”
By now, the surface looks fine.
What it looks like:
- No more peeling
- Tattoo appears clearer
- Skin looks mostly normal
What it feels like:
- Occasional mild itching
- Slight sensitivity
Here’s the catch:
Even though it looks healed, the deeper layers are still repairing.
What’s Happening Internally
- Collagen is rebuilding
- Skin structure is stabilizing
- Ink particles are being locked in place
What You Should Still Be Doing
- Keep moisturizing (once or twice daily)
- Avoid excessive sun exposure
- Don’t soak it (no long baths or swimming yet)
Mistake I almost made:
I nearly stopped aftercare completely because it looked fine. Glad I didn’t this stage is crucial for long-term quality.
Stage 5: Fully Healed (After 4–6 Weeks)
This is when everything settles.
What it looks like:
- Colors look richer
- Lines appear sharper
- Skin feels normal
What it feels like:
- No itching
- No sensitivity
At this point, your tattoo is part of your skin not a healing wound anymore.
When Itching Is NOT Normal
Not all itching is harmless.
Watch out for these signs:
Possible Infection Symptoms
- Intense redness spreading outward
- Pus or unusual discharge
- Severe pain (not just itching)
- Fever
Allergic Reaction Signs
- Rash beyond tattoo area
- Persistent swelling
- Raised bumps
If you notice any of these, don’t try to fix it yourself see a professional.
Tools & Products That Actually Help
Over time, I’ve tried a bunch of products. Here are a few that genuinely made a difference:
- Fragrance-Free Lotions
- Basic pharmacy lotions work fine
- Avoid anything with strong scents
- Gentle Soap
- Look for mild, skin-friendly options
- No exfoliating beads or harsh chemicals
- Aftercare Balms
Some tattoo artists recommend specific balms. They’re useful but not magic. The key is consistency, not brand.
A Simple Daily Routine (That Works)
Here’s the exact routine I now follow:
Morning:
- Wash tattoo gently
- Pat dry
- Apply a thin layer of lotion
Afternoon:
- Light reapplication if it feels dry
Night:
- Clean again if needed
- Apply lotion before bed
That’s it. No complicated steps.
Lessons I Learned the Hard Way
If I could go back and redo my first tattoo healing process, I’d do a few things differently:
- Use less ointment in the beginning
- Never scratch, not even “just a little”
- Be patient during the peeling phase
- Stick to simple products instead of experimenting
Healing a tattoo isn’t complicated but it does require discipline.
Final Thoughts
The itching phase is the part nobody really talks about, yet it’s where most people mess up their tattoo.
It can feel annoying, distracting, even unbearable at times but it’s also a sign that your body is doing exactly what it’s supposed to do.
If you can get through those itchy days without scratching, over-moisturizing, or panicking, your tattoo will heal clean, sharp, and exactly the way it was meant to.
And once it’s fully healed, that frustrating itch will feel like a small price to pay for something permanent you actually love.